
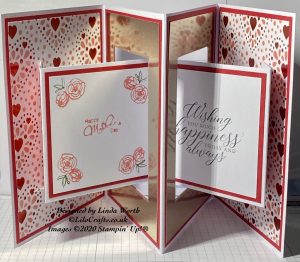
Keeping the theme of ‘Mothers Day’ this week, here is another card cased from Mixed Up Craft. Inside card adjusted to dies I have.
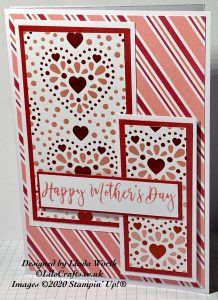

Finished card size is 5 x 7 inches
- Thick Whisper White cardstock
- card base – 10 x 7 inches, score on long side at 5 inches
- card base – 10-1/2 x 7 inches, score on long side at 5 and 10 inches
- insert – 4 x 11-3/4 inches, score on long side at 1/2, 2, 5-7/8, 9-3/4, 11-1/4 inches
- Whisper White
- front larger layer – 3 x 5-1/4 inches
- front smaller layer – 2 x 4-1/4 inches
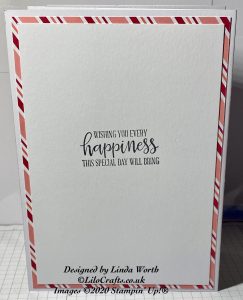
- sentiment – 3-5/8 x 7/8 inches
- back – 4-1/2 x 6-1/2 inches
- insert main panels 2 pieces – 3-3/8 x 3-1/2 inches
- Red Red cardstock
- front larger layer – 2-3/4 x 5 inches
- front smaller layer – 1-3/4 x 4 inches
- sentiment – 3-3/4 x 1 inches
- inside 4 pieces – 4-3/4 x 6-3/4 inches
- insert side panels 2 pieces – 1-1/4 x 3-34 inches
- insert main panels 2 pieces – 3-5/8 x 3-3/4 inches
- DSP
- front and back layer 2 pieces – 4-3/4 x 6-3/4 inches
- front larger layer – 2-1/2 x 4-3/4 inches
- front smaller layer – 1-1/2 x 3-3/4 inches
- inside 2 pieces – 4-1/2 x 6-1/2 inches
- insert side panels 2 pieces – 1 x 3-1/2 inches
- Silver Foil
- inside 2 pieces – 4-1/2 x 6-1/2 inches
Before putting the card together you need to die cut or if preferred manually cut, the rectangles. Place the die centrally on the silver foil die cut the rectangle (ensure that the length is fractionally longer than 4 inches), on the next piece of silver foil make sure that it is cut in the same position so the insert when added is straight. Lay the foil on top of the red cardstock ensuring equal borders, mark lightly with a pencil the rectangle shape and die cut the rectangle. Lay the red piece on top of the card base centrally again mark rectangle and die cut; repeat this on the other red and white pieces – make sure the half inch tab on the card base (white piece) is next to the cut rectangle. Adhere these pieces together ensuring the rectangles line up. Adhere the two pieces of the card base together by the half inch tab – this will adhere to the back of the other piece ensuring the top and bottom are lined up.
Adhere the layers to the insert stamping any sentiments/decoration to the white layers before adhering.
Adhere the two Red pieces to the inside of the card, the next piece is optional but if you want to hide the insert tabs then you need to this to the inside DSP pieces. Lay DSP on red cardstock with equal borders, with insert fold the panel and tab behind and line up the score line with the red cardstock – ensuring that the insert is also lined up to go through the rectangle. Holding all in place open the insert and mark with a pencil at the half inch score line top and bottom – cut between these two marks, make it tight you can always lengthen after and slightly move your ruler and cut another line making a small slit for the insert tab to go through without buckling the DSP; repeat for the other piece.
If you do not want to make a slit to hide the tab – adhere the DSP to the red cardstock, come in approximately 1-3/8 inches from edge of DSP adhere the tab, thread the insert through rectangles and adhere tab to other piece of DSP.
Thread one side of the insert piece through the DSP and adhere the tab to it, then adhere the DSP to the the red cardstock. Thread the insert through the rectangles, thread tab through DSP slit, adhere tab to DSP and adhere the DSP to the other red piece. The insert middle should be a valley fold and the card base middle should have a mountain fold.
Decorate the front and back of the card,, stamp sentiment on front and back white before adhering due to the bulk of the card.
Thank you for looking and hope you enjoyed this project. The supplies are listed below and linked to the online store, I would love to be your demonstrator if you are interested please contact me.
Linda x
Product List
")


Hi Linda…I love your mothers day double lock concertina card and would love to make it but I dont have the rectangle dies to make the aperture, could you please tell me the size of the opening so that I can cut it by hand….thank you..Yvonne Andrews
Hi Yvonne, pleased you love the card. My advice would be to cut the opening no larger than 1/4 inch bigger than the inner card for this to clear, preferably 1/8 inch as this helps keep the inner piece in place slightly. Hope this helps x
Hi Linda…thank you for your reply but I was wondering how wide is the aperture? I am having to cut it by hand as you can no longer buy the dies…thank you
Yvonne Andrews
Hi Linda, thank you for your reply but what I am really after is the width measurement of the aperture as when I made my card the inner mechanism kept getting fouled up and caught every time the card was opened or closed.
thanking you
Yvonne
Hi Yvonne, the size was approx 4-1/8 x 2-1/8 inches, if it would help check out the video I saw it on https://youtu.be/VYaOpu20TC4