
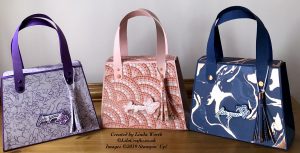
Needed some small gift bags for friends for the weekend to hold some sweets for them. What to present the gifts? decided to case Intatywne Designs Designer Purse tutorial. These were so easy to make and used colours that suit the individuals,
- Coloured cardstock – 11.5 x 5 inches, score on long side at 1, 4.75, 6.75, 10.5 inches, score on both short sides to first score line only at 0.5, 4.5 inches; 2 pieces 4.25 x 3 inches score on 3 sides at 0.5 inches (2 sides and bottom), on short side (top) score at 1.5 inches down 2.75 inches (for side pieces); 2 pieces 0.5 x 9 inches (for handles)
- DSP 2 pieces 4-7/8 x 3-5/8 inches; 2 pieces 3-7/8 x 7/8 inches (top of bag); 2 x 2.5 inches score long side side at 0.5 inches (for tassel); 0.5 x 1-1/8 inches (to cover top of tassel)
On the large piece of coloured cardstock, with a ruler draw a faint pencil line from the 1/2 inch score lines to the score line which indicates the bottom of the bag, cut along these lines, remove the rectangle at the top of the bag and round two of the corners on the closing flaps. This will give you the shape of the bag. On the two side pieces score lines from the central line to the 1/2 inch score lines to form a triangle, this will help the side pieces insert when the bag closes. On these two side pieces each corner there is a square, remove these squares (4) and slightly mitre all edges. On the two larger pieces of DSP on the top edge mark in 1/2 inch on each side draw a line to the bottom corner and cut these diagonal lines.
Adhere the DSP to the front and back of the bag. You can use magnets or velcro dots, I used magnets and these need to be added to the top of the bag before adding the DSP to cover the magnets. If using velcro these are added after the DSP is adhered. Remember to round two of the corners on each piece if the cardstock has also been rounded.
I added the handles at this point but these can be added after the bag is complete, do whichever you are more comfortable with. Run the bone folder along each handle so it curves slightly, round the corners and adhere approx. 1 inch of the handle to the bag, ensuring equal distance from the side of the bag for each handle. If you have made the tassel already add this before securing the handles,
Adhere the bottom tab of the side pieces to the bottom part of the bag, adhere each side tab to the bag – best to use liquid glue to have wriggle room to line up the side and bottom pieces.
Make Tassel – if preferred this can be made before the bag. Cut at 1/8 inch intervals to the 0.5 inch score line. With a pair of tweezers hold onto one end of the 1/2 inch piece and tightly roll around the tweezers. then adhere tear and tape and reroll to form the tassel. Add tear and tape to the 1/2 inch part of the tassel add twine (if handles already adhered add around one handle). Add tear and tape to the 0.5 x 1-1/8 inch DSP and cover the 1/2 inch top of the tassel covering the twine, making it more secure.
Add sentiment if required, add to the front of the bag using dimensionals and add some faceted gems to the handles.
You now have a completed beautiful unusual gift bag.
Thank you for looking.
Linda x
Product List


