
This item was cased from Scrimping Mommy and I have added my own twist. Loved making this item and will be making a couple more, will make lovely gift or a craft fayre item. Magnets have been used to close the flap
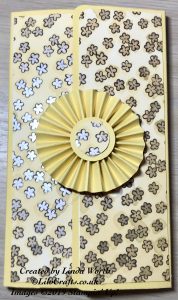
Closed
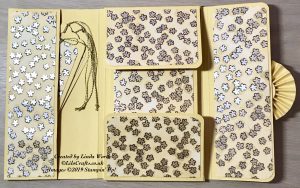
Inside
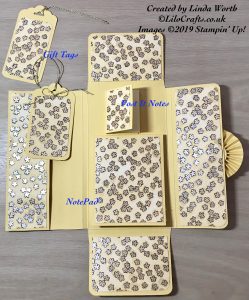
Fully opened
Materials Needed
- So Saffron cardstock – 8.5 x 12 inches, score on long side at 2.5, 5.75, 9.5, 9.75 inches, score on short side at 1 and 7.5 inches; 2 pieces 3 5/8 x 2.5 inches for flaps; length of cardstock x 1 inch, on long side score at every 1/4 inch (for rosette); 3/4 inch circle piece; 3 x 0.75 inches, score at 0.5 and 2.5 inches (to hold post it note); 4.5 x 1 inches, score at 0.5 and 4 inches (to hold notepad)
- DSP – 4 pieces 3 3/8 x 2.25 inches (flaps); 6.25 x 1.75 inches (front pocket) 2 pieces 6.25 x 2 inches (front flaps); 6.26 x 3.25 inches (for front); 1/2 inch circle piece
- Post it Notes (2 x 1.5 inches – adjust if different) – Cardstock 2 x 3.25 inches; DSP 1.75 x 1.25 inches
- Notepad (3.25 x 4 inches adjust if different size) – cardstock 3.25 x 5 inches; DSP 3 x 3.75 inches (covering is optional)
- Gift Tags – cardstock 2 x 4.5 inches and 2 x 3.5 inches; DSP 1.75 x 3.5 inches and 1.75 x 2.5 inches
Putting item together
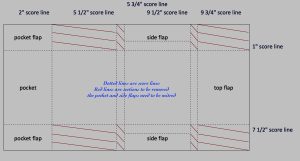
- The diagram above shows the score lines and the sections to be removed from the coloured cardstock, on the side flaps score each with a 1/4 inch score from the inside edge (this matches the other 1/4 inch score lines)
- Round the corners of the top flap and two of the corners of the flaps on the main piece of Cardstock together with the matching DSP pieces
- Place liquid glue on the pockets flap and stick to the cardstock
- Adhere the DSP pocket piece to the pocket just formed
- Adhere one piece of DSP flaps to each the flap cardstock
- Place liquid glue on the flap cardstock and adhere to the side flap place straight edge to the 1/4 inch score line
- Adhere the matching DSP flaps on top of the side flap covering the join
- Adhere the DSP to the front of the flap, place a magnet to the inside of the flap and adhere the other front flap to the inside, covering the magnet; you can use velcro it you prefer
- Place the corresponding magnet on top of the magnet secured and place a glue dot on the magnet and then close the flap ensuring that the magnet with the glue dot is secured to the front
- Adhere the DSP to the front covering the magnet (magnets are strong and by covering them with DSP reduces the strength but are still strong enough to hold the item closed)
- Adhere the half inch score lines to the inside vertically for the post it notes and horizontally for the notepad, once stuck slide in the notepad and posit notes
- Use the scalloped top punch on the cardstock for the gift tags and adhere the DSP to them, add some twine or ribbon and place in the pocket
- Fold the rosette strip ensuring the first fold is a mountain fold and the last fold is a valley fold if not remove the last fold until last one is a valley fold; add some liquid glue to one side of the valley fold and stick to the mountain fold at the start
- Once stuck flip the cardstock to form a circle, use liquid glue adhere one of the cardstock circles to the rosette (hot glue gun is better to use if you have one), once secure adhere the other circle to the other side of the rosette, then adhere the DSP circle to the top of one circle
- Adhere the rosette to the front flap using liquid glue ensuring only one half of the circle has the glue on
- The stationery folder is now complete
Thank you for looking, and enjoy making your version.
Linda x
Product List
 Cardstock Pack")


