
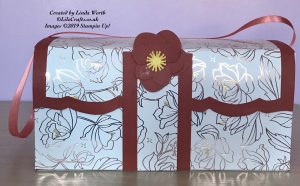
Needed a box or bag to hold 6 chocolate packages side by side, found a satchel bag tutorial from Mixed Up Craft and cased the concept to fit my requirements. This is more of a box than a bag shape created it using retired Springtime Foil DSP and Cajun Craze cardstock. You can create this satchel box using any DSP/cardstock.
Satchel Bag
- 2 pieces of DSP 10.5 x 10.5 inches, score at 0.5 and 10 inches on one side (front and back pieces), score on other side at 6 inches, on both pieces
- 2 pieces cardstock (side panels) 6 x 12 inches, score on long side at 2 and 6.5 inches
- DSP (lid) 8.5 x 12 inches, score on long side at 0.5 inches
- cardstock (lid) 9.5 x 12 inches, score on long side at 1 inch
- DSP (strap closure) 9 x 1.5 inches
- cardstock (strap closure) 9.5 x 2 inches
- cardstock for the flower
- 2 x 1 inch circles in DSP and 2 x 1 inch circles in cardstock
On the DSP side pieces remove the the 1/2 inch score lines on the bottom section but at this point cut straight do not mitre (remember the bottom is the 6 inch rectangle, the 4.5 inch section is the front/back).
Before adhering the side panels mitre each side of the 2 inch section (this forms part of the base and you need to ensure this cannot be seen when the bottom section is adhered, may be need to adjust before final closure).
Adhere the DSP (front and back) to side panel pieces of cardstock using the 1/2 score lines on the DSP (you will stick the DSP to the outside of the side panels not to the inside) in the 4.5 inch section of the side panels. On the top 5.5 inch section you can leave this as it is or make a very thin self closure, if you want the closure then faintly draw a pencil line 1/4 inch in from the end and along this line make a mark at 3 inches. You will need to cut along this line to fractionally past the centre point but from alternate sides so they can latch into each other. You may think this is easier to do before adhering the side panels which can be done but you want to ensure that the closure is correct, obviously a narrower box/bag will give you more cardstock to play with for the closure.
Now decide how far you want the lid to come over the front panel, once you have decided shape the front of the lid cardstock. Place the DSP lid piece over the cardstock, ensure that you have the same borders all around – approx 1/2 inch – shape the DSP the same as the cardstock. Decide where you want the magnetic closure to be on the lid and add a magnet to the reverse of the DSP centrally with a glue dot. Before adhering the lid pieces together gently roll the cardstock and DSP pieces with your hands so it not fully flat, i.e. has a gentle curve. Add a glue dot to the magnet and adhere the DSP to the cardstock centrally matching the score lines on the back. Adhere the lid to the back of the box using the 1 inch score line as a guide.

Prepare your flower by die cutting 2 sets of petals in matching cardstock and 2 flower centres in So Saffron. Add a magnet to the centre of one of the petal pieces, adhere the other set by overlapping them and slightly curl the ends, adhere the centre pieces again overlap them and adhere to the centre of the flower.
Now you may have been thinking that you have not adhered the base of the box, this is because of the strap that is used in this design. Firstly fold in your front base and adhere just the base side panels to this. Secondly adhere the flower to the top of the cardstock closure strap, let the magnets find each other then gently pull on the strap and make a crease where it will fold under the front of the box, leave about 2 inches to adhere to the base and remove the rest of the cardstock. Slip the DSP strap piece under the flower and adhere to the front of the strap centrally to the crease. Keeping the strap closure on the magnet adhere the strap to the base of the box and the adhere the final piece of the base.
With the take your pick tool make a hole on each side of the box centrally about 1.5 inches down fro the top. Cut your length of ribbon required turn up the ends, make a hole centrally in the DSP circle and throughout the ribbon, add a brad, push through the hole on the box and fasten. Cover the inside of the brad with the cardstock circle but only adhere the edge of the circle to allow the brad to turn.
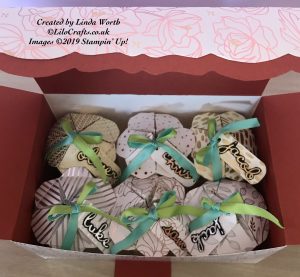
Add your contents and your bag is now complete.
Thank you for looking and hope you make your own versions.
Linda x
Product List

 Cardstock")

 Circle Punch")
