
These cards are made using items from the Wrapped in Plaid suite. The trees used on these cards are put together the same way,
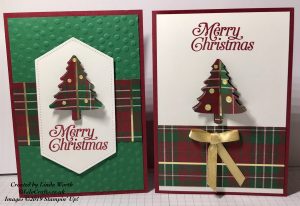
Cherry Cobbler card base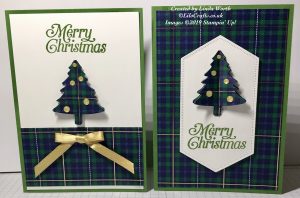
Garden Green card base
Finished card size 4-1/8 x 5-7/8 inches
- Cardstock card base – 8-1/4 x 5-7/8 inches, score on long side at 4-1/8 inches
- Whisper White
- Inside message – 3-7/8 x 5-5/8 inches
- Front card layer – 3-7/8 x 5-5/8 inches
- Piece to die cut second largest stitched nested label
- DSP
- Front card large layer – 3-7/8 x 5-5/8 inches
- Front card layer – 2 x 3-7/8 inches
- Inside card layer – 1/2 x 3-7/8 inches
- 4 punched trees
- Shaded Spruce layer – 3-7/8 x 5-5/8 inches
Cherry Cobbler cards
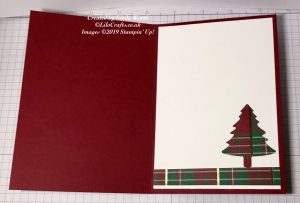
- Shaded Spruce layer has been embossed using retired Decorative Dots folder but other embossing folders can be used, adhere to card base using tear and tape. Using liquid glue adhere the 2 inch wide DSP layer centrally to card front (width will be same as layer). Die cut whisper whisper stitched nested label, stamp sentiment in Cherry Cobbler, add trees (see putting tree together below). Add dimensionals to the label and add centrally to card front. Add inside layer, together with DSP strip and spare tree (see photo).
- Adhere Whisper White layer to card front, stamp sentiment in Cherry Cobbler, add 2 inch wide DSP layer towards the base of card front, add tree (see putting tree together below). Add ribbon to card front. Add with inside layer, together with DSP strip and spare tree (see photo).
Garden Green cards
- Adhere Whisper White layer to card front, stamp sentiment in Garden Green add 2 inch wide DSP layer towards the base of card front, add tree (see putting tree together below). Add ribbon to card front. Add inside layer, together with DSP strip and spare tree (see photo).
- Adhere DSP to card base. Die cut whisper whisper stitched nested label, stamp sentiment in Garden Green, add tree (see putting tree together below). Add dimensionals to the label and add centrally to card front. Add inside layer, together with DSP strip and spare tree (see photo). Add inside layer, together with DSP strip and spare tree (see photo).
Putting tree together
Using score board, place 3 of the trees so the top of the tree sits in the groove and score the length of the tree. On base layer add liquid glue either side of the score line and add to layer, add two small square dimensionals (mini dimensional squared) as shown.
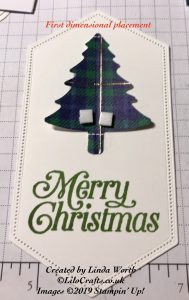
Add liquid glue to the second tree on the score line but do not add glue to the tip or trunk, fold on score line adhere on top of previous tree between the dimensionals, add two more dimensionals but higher this time.
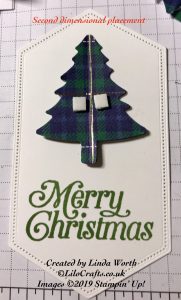
Add the final tree, by adding glue to the score line again not to tip or trunk. Adhere on top of previous trees between the dimensionals. Add embellishments to the top tree as required.
Card(s) now complete.
Thank you for looking and hope you enjoyed this project. The supplies are listed below and linked to the online store, I would love to be your demonstrator if you are interested please contact me.
Linda x
Product List


